
Integrating Checkout Widget
The checkout widget is a payment interface that enables you to securely collect payments from customers on your website or application. With supported payment methods like cards and ACH transfers, the widget ensures a smooth and secure checkout experience for your customers. Check out our API Docs for endpoint details and request examples.
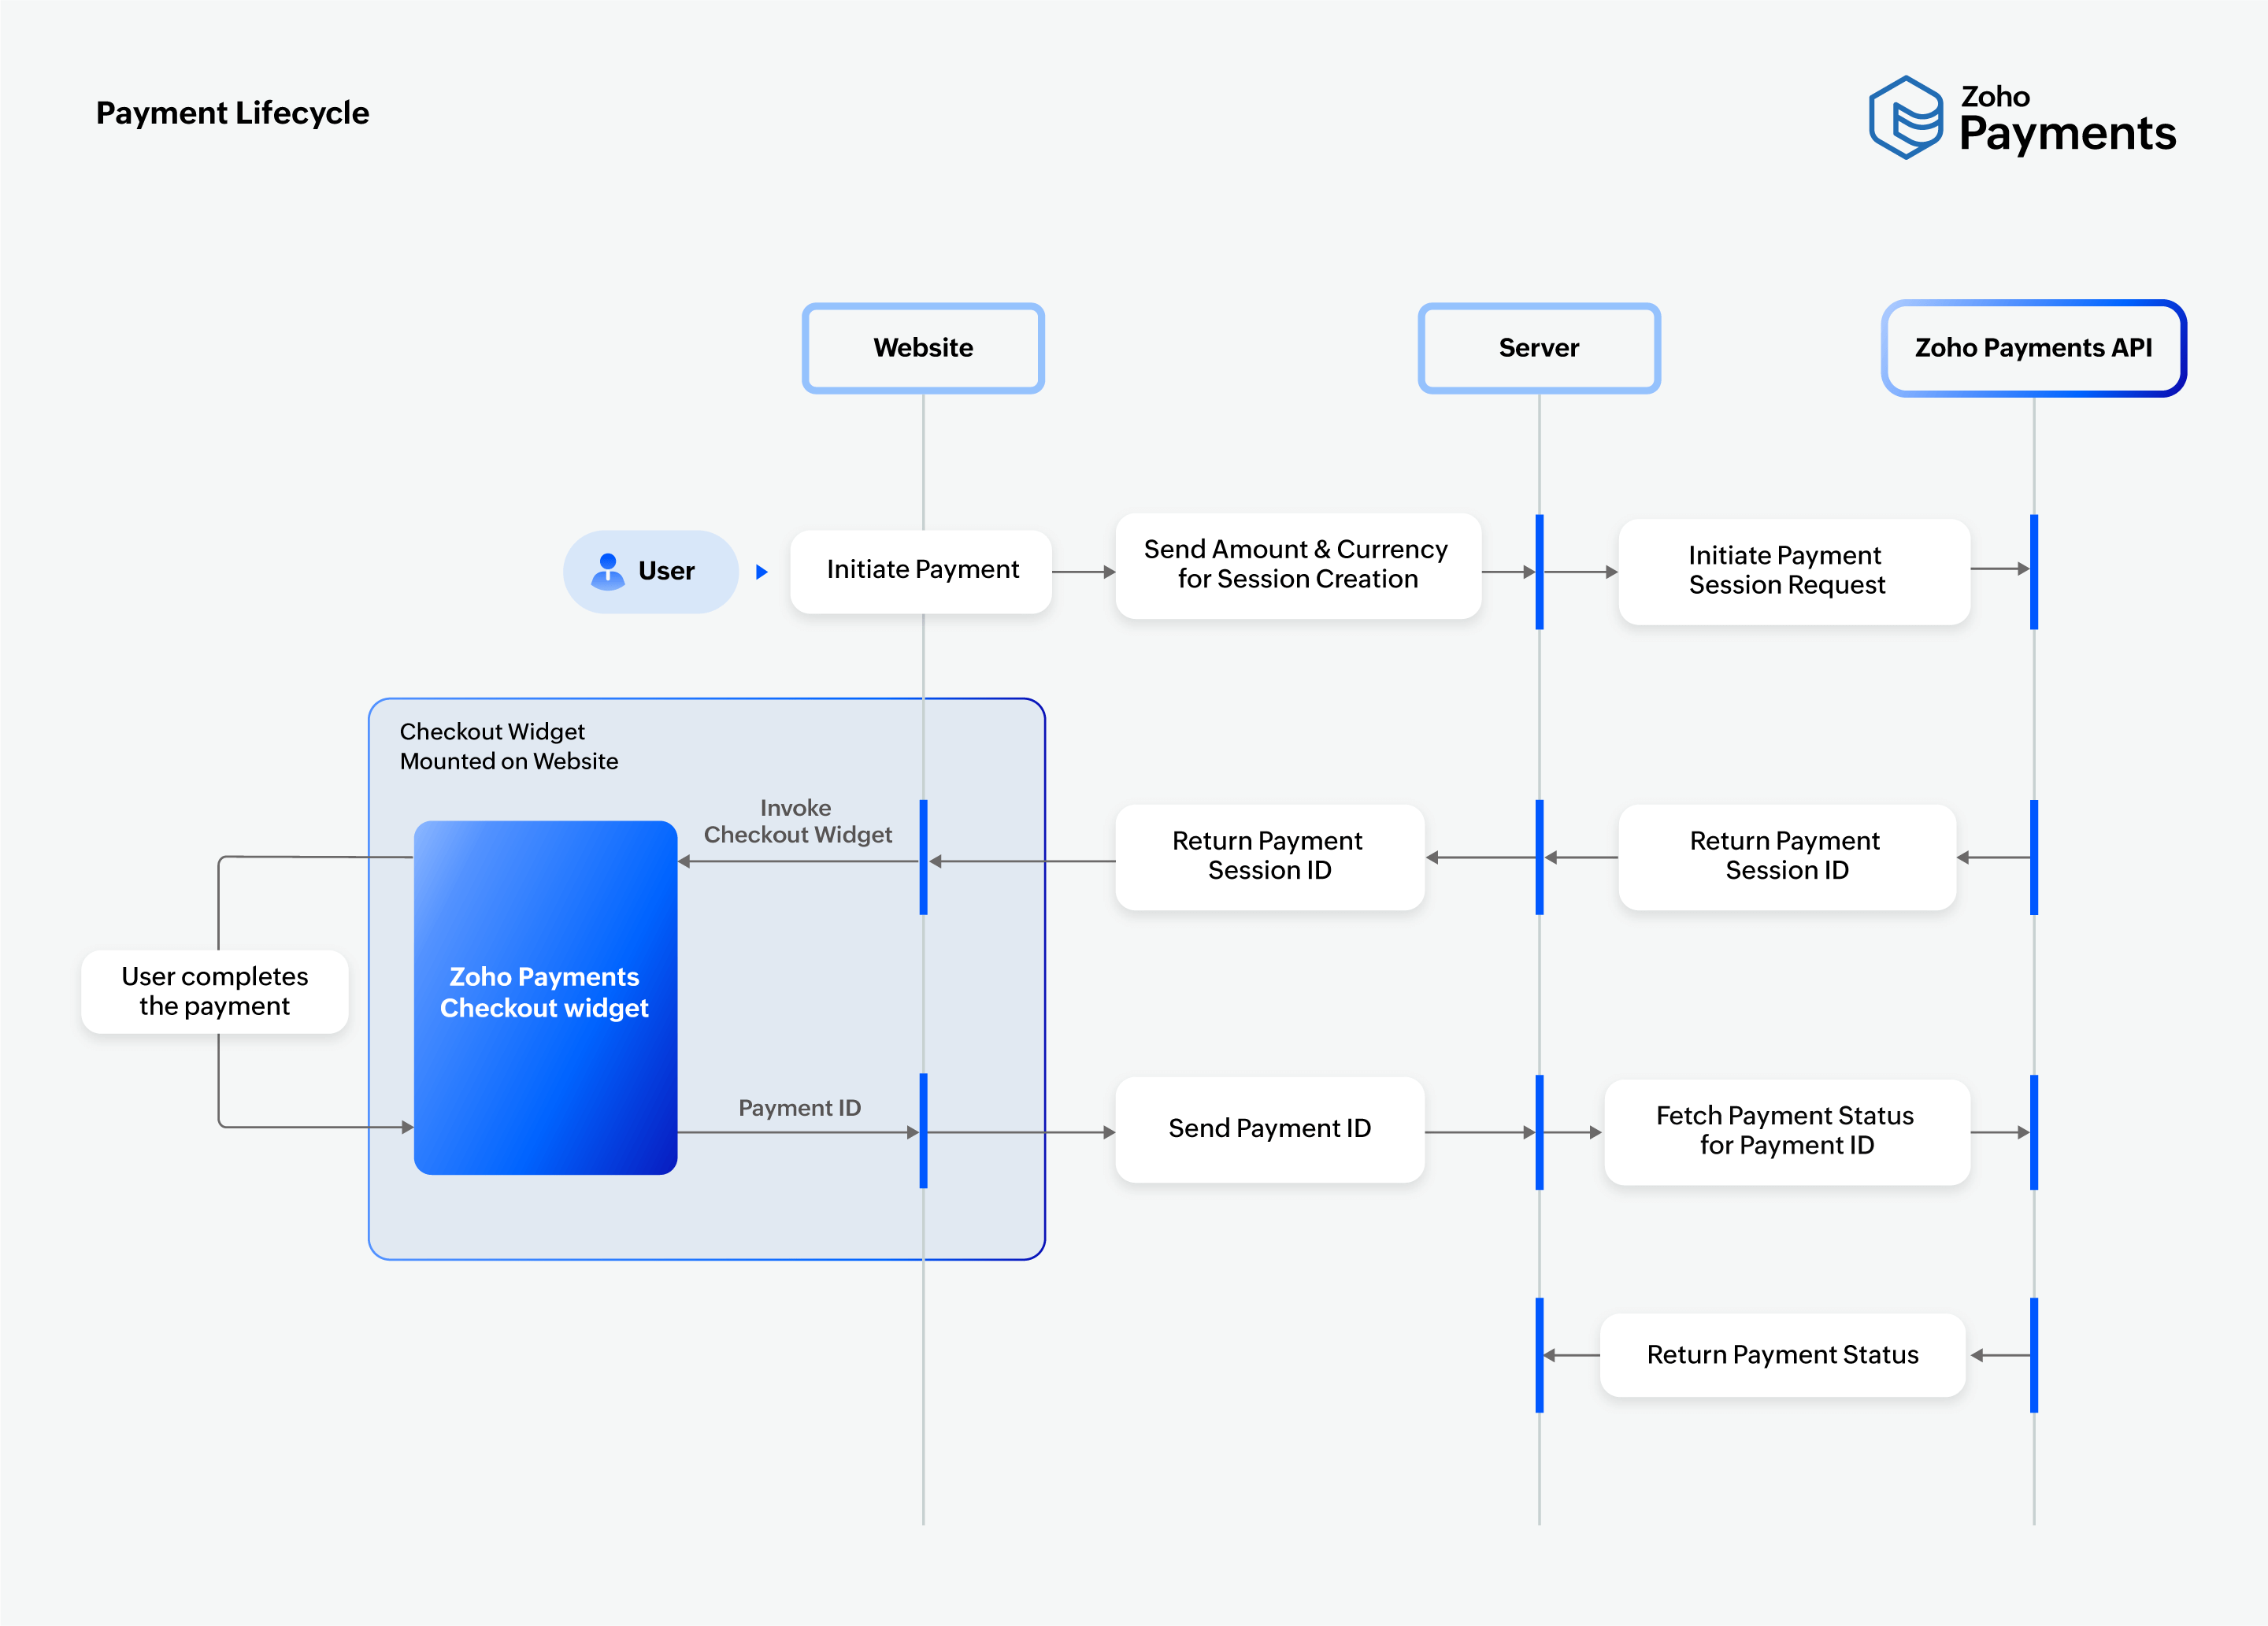
Here’s an outline of the end-to-end payment process through Zoho Payments' checkout widget.
Follow the steps below to configure the checkout widget on your website.
1. Establish Communication
To communicate with our APIs, you must first establish connectivity. Ensure that your setup allows or whitelists the Zoho Payments domain, payments.zoho.com.
2. Create Payment Session
To initiate the payment process, you need to create a payment session on your server by calling the Payment Session Create API. To obtain the payment_session_id:
- Collect payment information from the website (amount, currency, etc.).
- Call the Payment Session Create API using the OAuth token generated from your server.
The API will return a payment_session_id, which you can use to integrate the checkout widget.
Note:
Each session allows up to five payment attempts, but only one can be successful. Once a payment attempt is successful, no further attempts can be made within that session. Any additional attempts will result in an invalid_payment_session error. To make more payment attempts, a new session must be created.
3. Integrate Checkout Widget
After receiving the payment_session_id from your server, you can invoke the checkout widget on your website. Zoho Payments' script helps you manage the payment flow easily.
- Add the Zoho Payments script given below to your website or application.
<script src="https://static.zohocdn.com/zpay/zpay-js/v1/zpayments.js"></script>
- Initialise the script using the API key generated from Zoho Payments' Developers Space.
let config = {
    "account_id": "23137556",
    "domain": "US",
    "otherOptions" : {
        "api_key": "1000.41d9xxxxxxxxxxxxxxxxxxxxxxxxc2d1.8fccxxxxxxxxxxxxxxxxxxxxxxxx125f"
    }
}
let instance = new window.ZPayments(config);
Note: Once initialized, reuse the same widget instance across your application wherever it is required.
- Invoke the
requestPaymentMethod()function withpayment_session_idto initiate the payment.
Note:
You should receive authorization from your customers to debit funds from their account for ACH payments. You can use this template for authorization:
By proceeding, you authorize {Business Name} to debit funds from your account for transactions made and credit them back to correct erroneous transactions. This authorization remains in effect until you choose to revoke it by contacting {Business' support email address}.
async function initiatePayment() {
    try {
        let options = {
            "amount": "100.5",
            "transaction_type": "payment",
            "currency_code": "USD",
            "payments_session_id": "2000000012001",
            "currency_symbol": "$",
            "business": "Zylker",
            "description": "Purchase of Zylker electronics.",
            "invoice_number": "INV-12345",
            "address": {
                "name": "Canon",
                "email": "canonbolt@zylker.com",
                "phone": "+182XXXXXXXX"
            }
        };
        let data = await instance.requestPaymentMethod(options);
    } catch (err) {
        if (err.code != 'widget_closed') {
            // Handle Error
        }
    } finally {
        await instance.close();
    }
}
 initiatePayment();
Once the checkout widget is integrated, you can collect payments, gather transaction details such as amount, currency, and customer information, and verify the payment status. You verify the payment status using the payment_id provided after the user completes the payment.
Note: Zoho Payments supports 135+ currencies globally. Here’s the list of supported currencies.
4. Confirm Payment
Once the customer completes the payment, the requestPaymentMethod() function returns a response that includes the payment_id. This ID can be used to track the payment status. Use the parameters returned by the widget to verify the signature and ensure the transaction data is authentic.
Note: In some cases, you may not receive the payment_id if the customer accidentally closes the widget before a response is returned. In such cases, use your configured webhooks or the payment_session_id to retrieve the payment status.
If a payment fails due to issues like payment errors or user cancellations, refer to the error messages to identify and resolve the issue.
5. Verify Payment Status
You can verify your payment status in three ways:
-
Verify via Widget Response: After receiving the
payment_id, verify the payment status using the Payment Retrieve API. -
Verify via Webhooks: Use your configured webhooks for the events payment.success and payment.failed to receive the final payment status directly.
-
Verify via Session ID: If you haven’t received the payment status via the widget response or webhooks, use the Payment Session Retrieve API to verify the payment result.
Note: Ensure that all three options are configured for reliable payment verification.
 Walkthrough of Zoho Payments personalized to your business needs