Currencies
Are you a global seller or a service provider dealing with customers and vendors from more than one country? Now its simple to manage all the currencies you deal with. You can add those currencies and exchange rates you deal with, to your Zoho Inventory account.
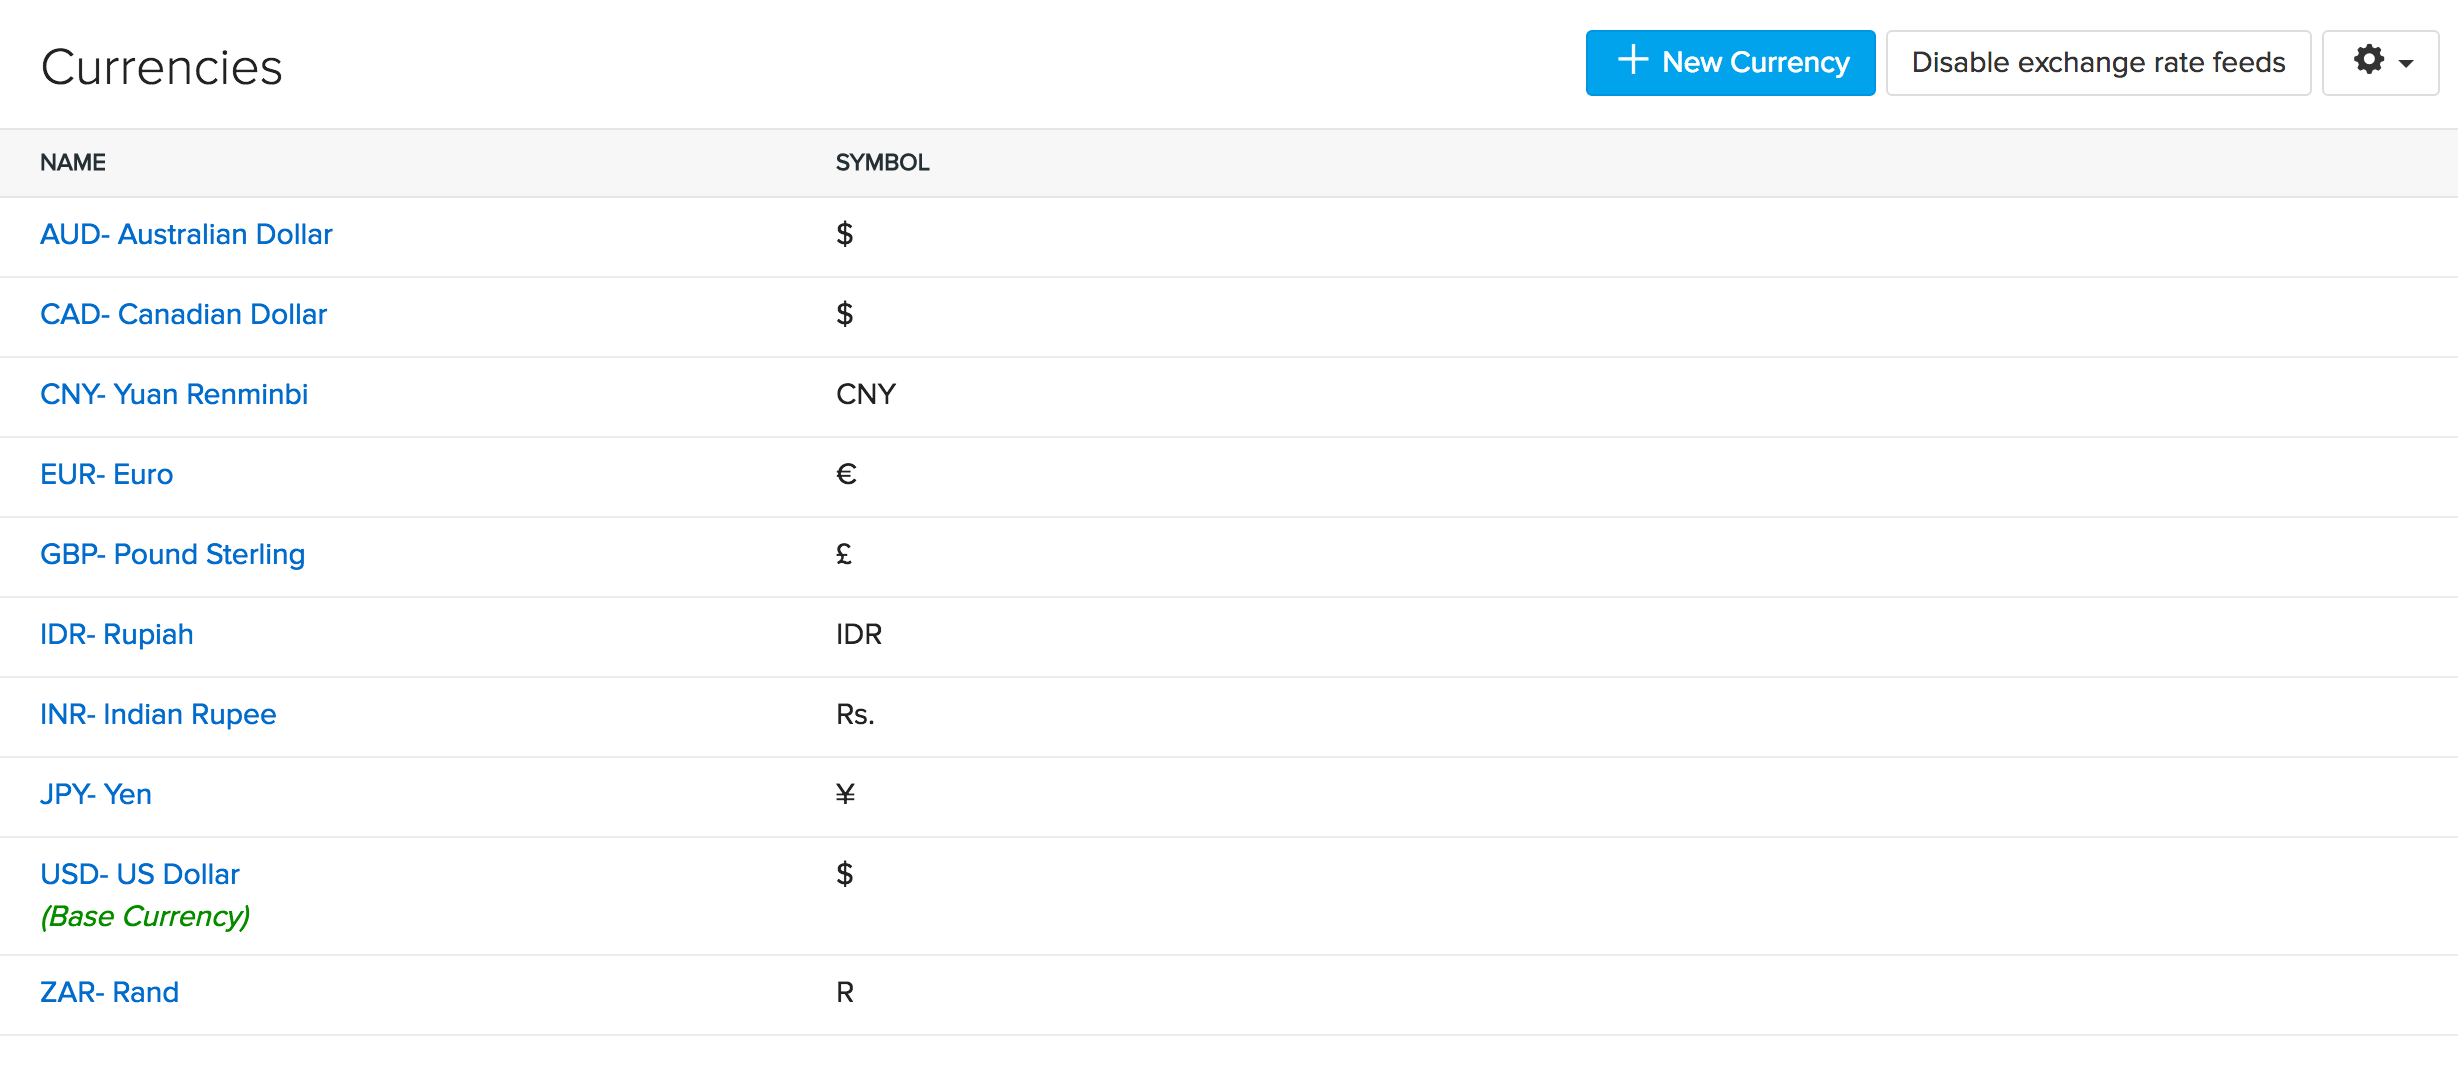
Here is an overview of how you can mange your currencies with Zoho Inventory.
Currencies
- Base currency
- Adding a new currency
- Editing a currency
- Deleting currencies
- Associating currencies to a contact
- Buying & selling items in a foreign currency
Currency Exchange rates
- Enabling Auto Exchange Rate Feeds
- Manually adding exchange rates
- Importing exchange rates
- Viewing exchange rates history for a currency
- Exporting exchange rates
Currencies
Base currency
This is your operating currency against which exchange rates are quoted in a given country. This will be set by you when you create an organization. The base currency will be applied to your item prices, transactions(as long as the contact has the same currency) and your reports.
- Please Note: At any point of time, you cannot delete your base currency. However, you can change your base currency if there are no transactions in your Zoho Inventory account. The moment you start transacting, the base currency becomes permanently applied to your organization.
Adding a new currency
To add a new currency:
- Open your Zoho Inventory organization.
- Click the Gear icon in the top right corner.
- Navigate to Organization Settings.
- Click Currencies under Setup & Configurations.
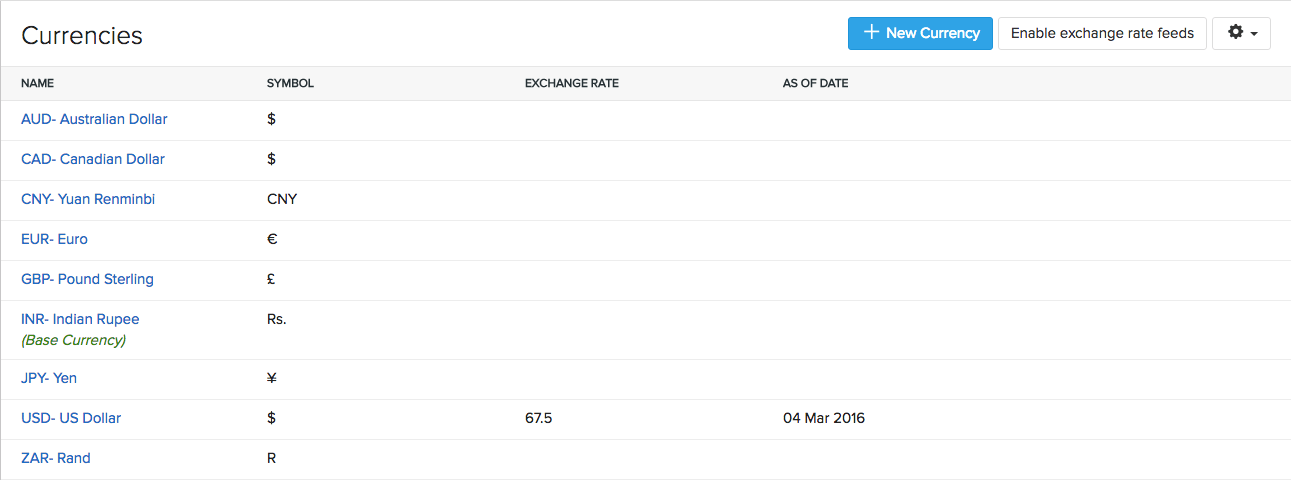
- You will be redirected to the Currencies module which will have a default list of currencies available.
- To add a new currency, click on the + New Currency button from the top right corner.
- This will trigger the New Currency pop-up.

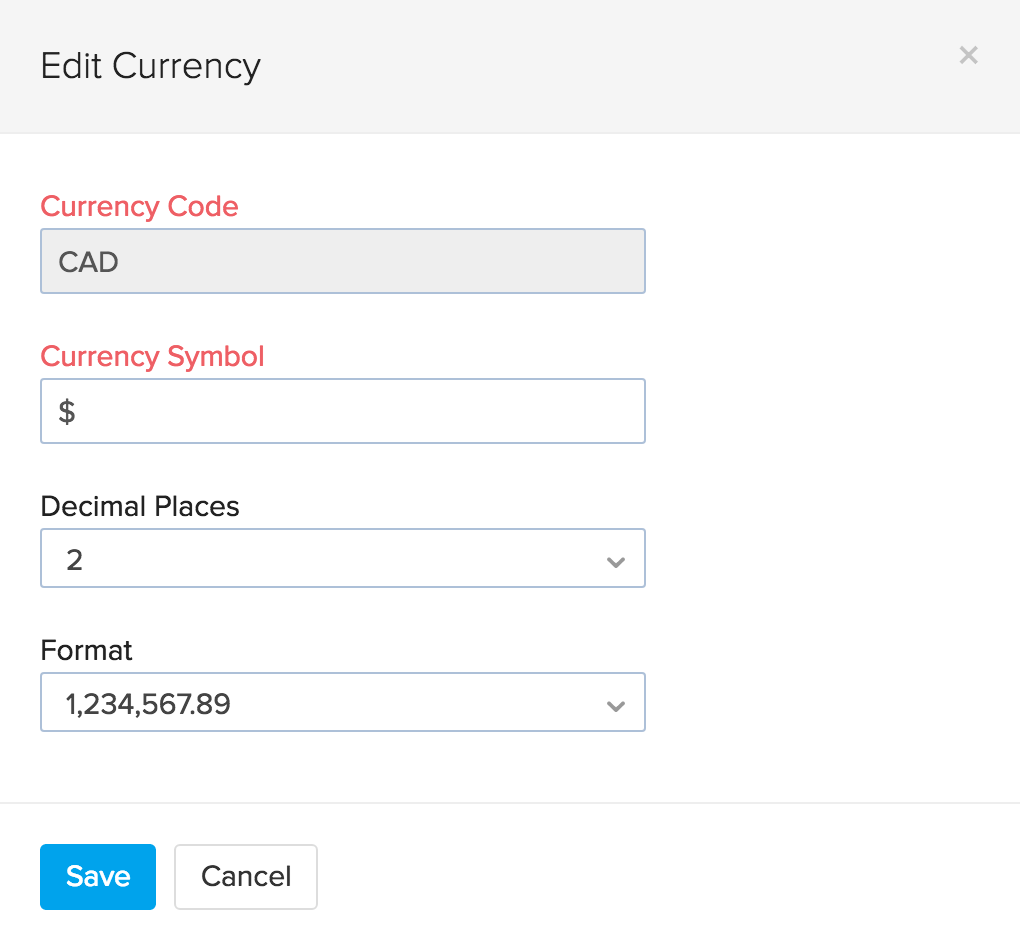
- Select the Currency Code from the dropdown provided.
- As per the Currency Code you select, the Currency Symbol, Decimal Places and Format will be auto filled. However, you may alter this if required.
- Click on the Save button to add the currency.
- The next step will involve feeding exchange rates. You can either enable automatic exchange rate feeds or feed them manually.
Editing a currency
To update currency information or the exchange rate for a currency, follow these steps
- Click the Gear icon in the top right corner.
- Navigate to Organization Settings.
- Click the Currencies under Setup & Configurations.
- Hover your mouse over the desired currency.
- Click on the Edit option.
- On the Edit pop up, you can edit the currency details & add an exchange rate.
- Click on Save button to update its parameters.
Deleting currencies
- Click the Gear icon from the top right corner.
- Navigate to Organization Settings.
- Click Currencies under Setup & Configurations.
- Hover your mouse over the desired currency.

- Click on the Trashicon option.
- This will trigger a confirmation pop-up.
- Click on the Delete button to delete this currency.
Note: You will not be able to delete your base currency.
Associating currencies to a contact
When you add a customer or a vendor to your Contacts, you have the a currency field where you can associate the contact with a specific currency.
If a customer or a vendor is from the same country as you, then the currency associated to them is going to be your base currency.
If the customer or vendor is from another country, then you can associate their respective currency. This currency will be applied to the transactions you have with them.
To learn more about contact creation, click here.
How To Video
Buying & selling items in a foreign currency
With your item prices and reports showing up in your base currency, you might be wondering, how do I buy an item from another country? or sell your goods to a customer beyond your border? Worry not. As always, we have a way!
Purchasing an item in foreign currency:
- Navigate to the Purchase Orders module under Purchases.
- Click on the quick create button. (+)
- You will redirected to a new purchase order page.
- Select your preferred vendor from overseas from the Vendor Name dropdown.
- The currency associated to this vendor will be automatically applied to the order.
- Add the items to be purchased.
- Above the items table, you will notice the exchange rate being applied to this transaction. You can also manually update the current exchange rate of a currency here.
- Save the purchase order and send it to your vendor.
- On another note, you may also associate an appropriate language template(for purchase orders) to international vendors. Click here to learn about creating templates in multiple languages.
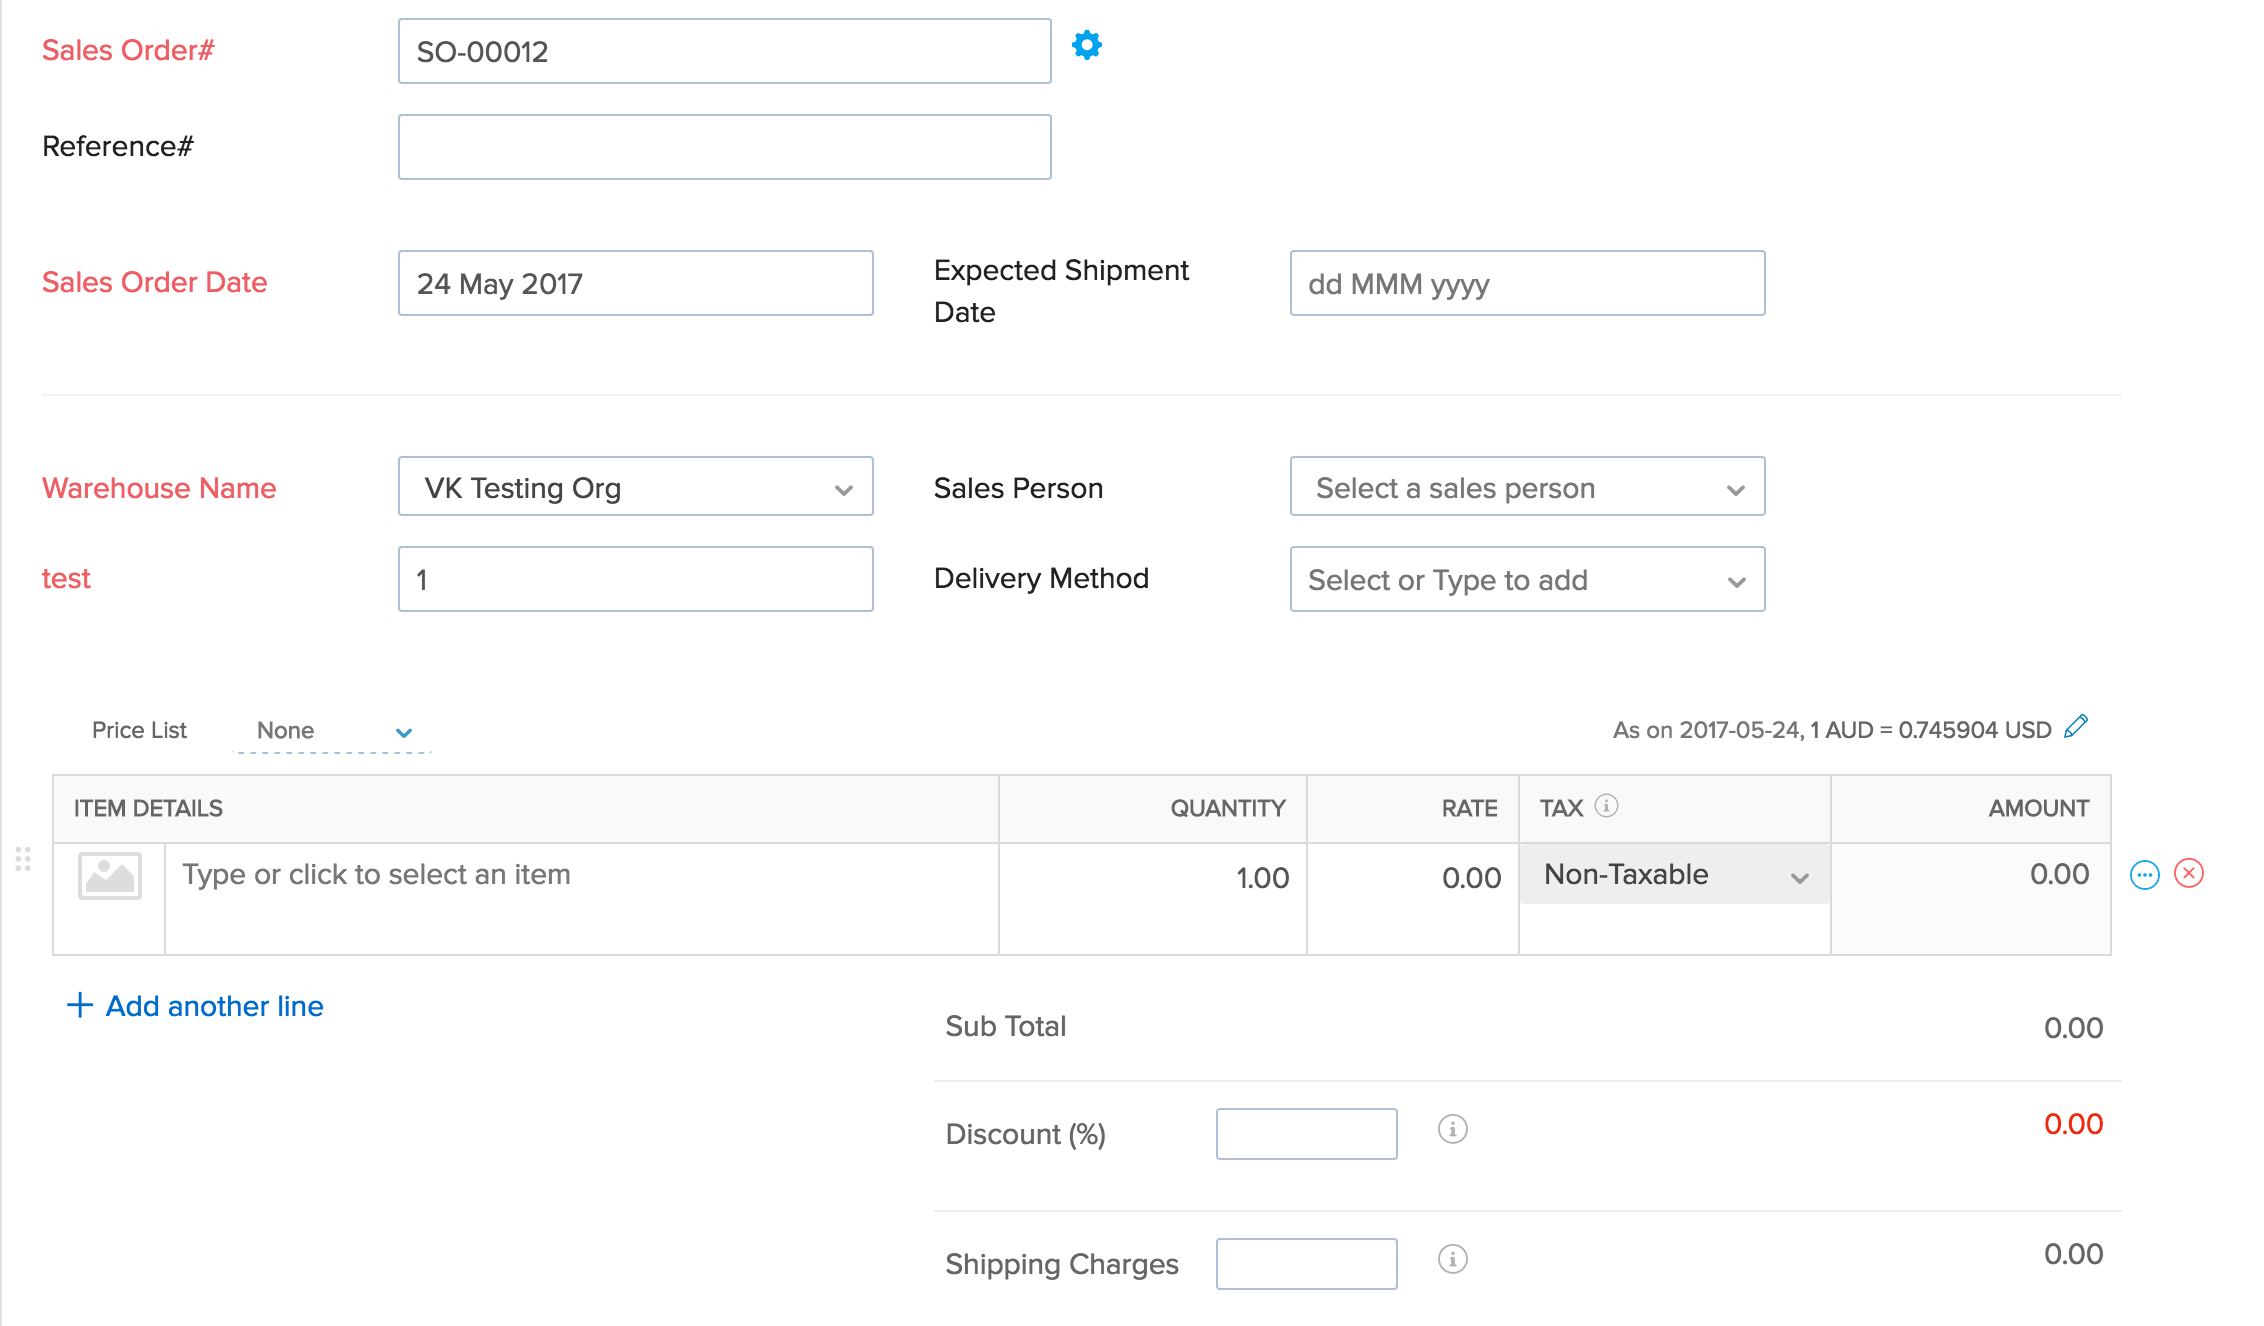
Selling an item in foreign currency:
- Navigate to the Sales Orders or the Invoices module.
- Click on the quick create button. (+)
- You will redirected to a new sales order or invoice page.
- Select your preferred customer from overseas from the Customer Name dropdown.
- The currency associated to this customer will be automatically applied to the order.
- Add the items to be sold.
- Above the items table, you will notice the current exchange rate being applied to this transaction. You can also manually update the exchange rate of a currency here.
- Save the sales order/invoice and send it to your customer.
- On another note, you may also associate an appropriate language template(for sales orders, invoices & payment receipts) to international customers. Click here to learn about creating templates in multiple languages.
Currency Exchange Rates
Enabling Auto Exchange Rate Feeds
To enable enable automatic exchange rate feeds,
- Click the Gear icon in the top right corner.
- Navigate to Organization Settings.
- Click Currencies under Setup & Configurations.
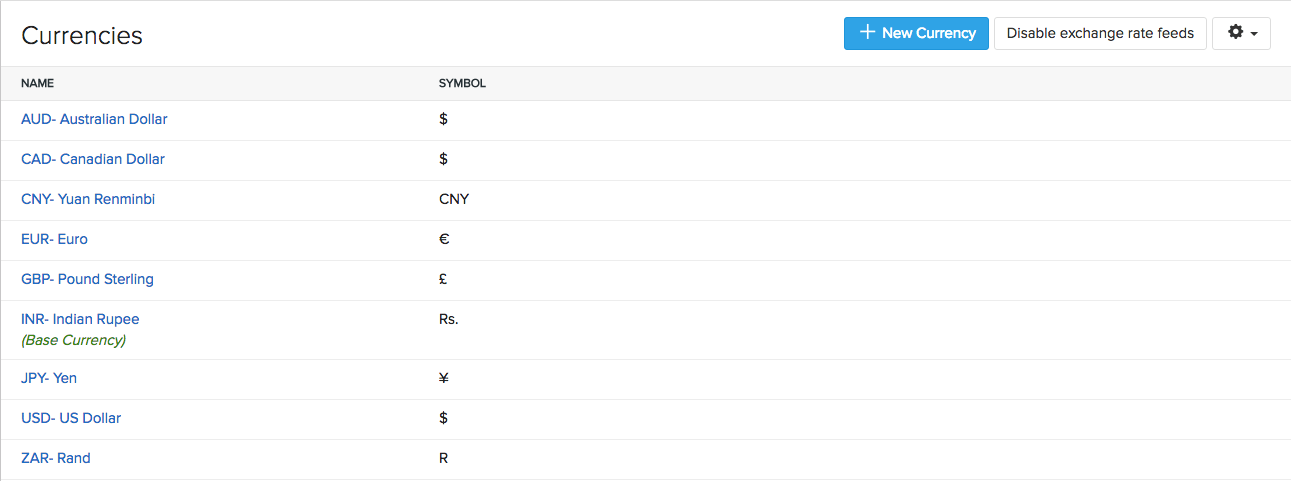
- Click on the Enable exchange rate feeds button present on the top right corner.
- A pop-up will inform you of the changes made by this choice. On clicking the OK button, you will be able to enable exchange rate fields.
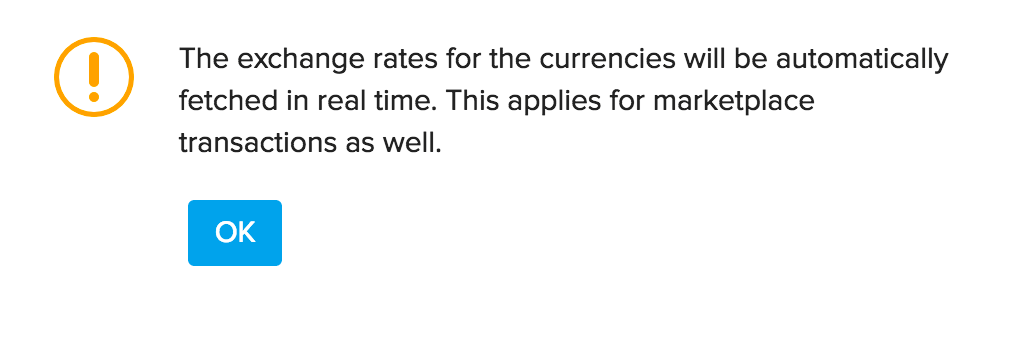
- Henceforth all your multi-currency transactions will now utilise these feeds.
- To disable it, follow the same steps and click on the Disable exchange rate feeds button that will be available in the exact same spot.
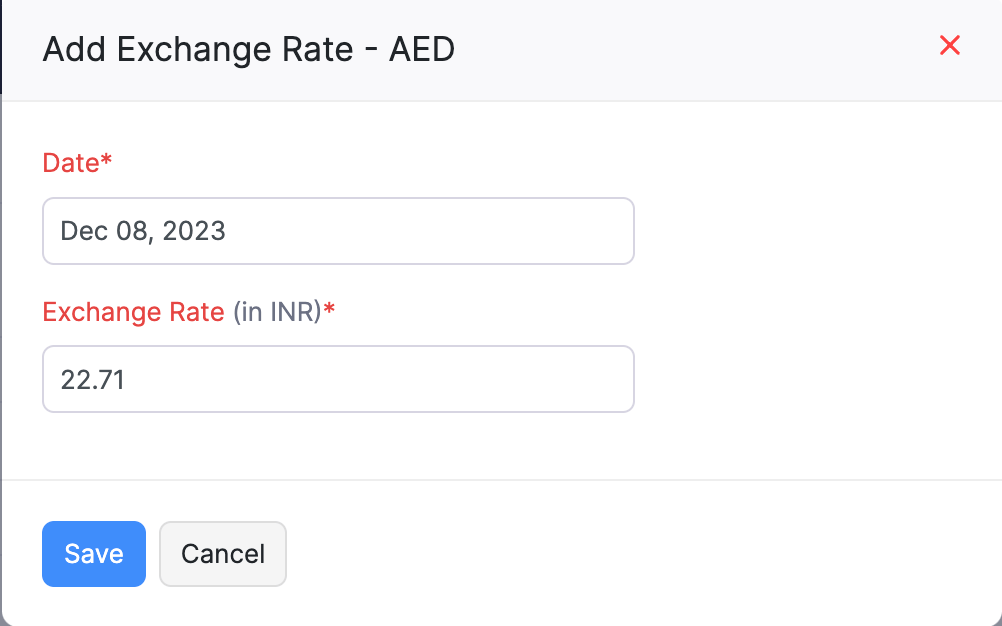
Manually adding exchange rates
If you wish to add the exchange rate for that currency:
- Click on the Add Exchange Rate button provided on the bottom, right hand side.
- In the exchange rate pop up window, click on the Date field and select the date for which the exchange rate is being entered.
- Enter the desired exchange rate.
- Click Save to add the exchange rate.
Importing exchange rates
You can also import exchange rate instead of manually entering them. To import exchange rates:
- Click the Gear icon in the top right corner.
- Navigate to Organization Settings.
- Click Currencies under Setup & Configurations.
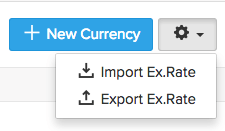
- Click More icon near the + New Currency button.(not regular settings gear icon but the one below it)
- Select the Import Exchange Rates option from the dropdown.
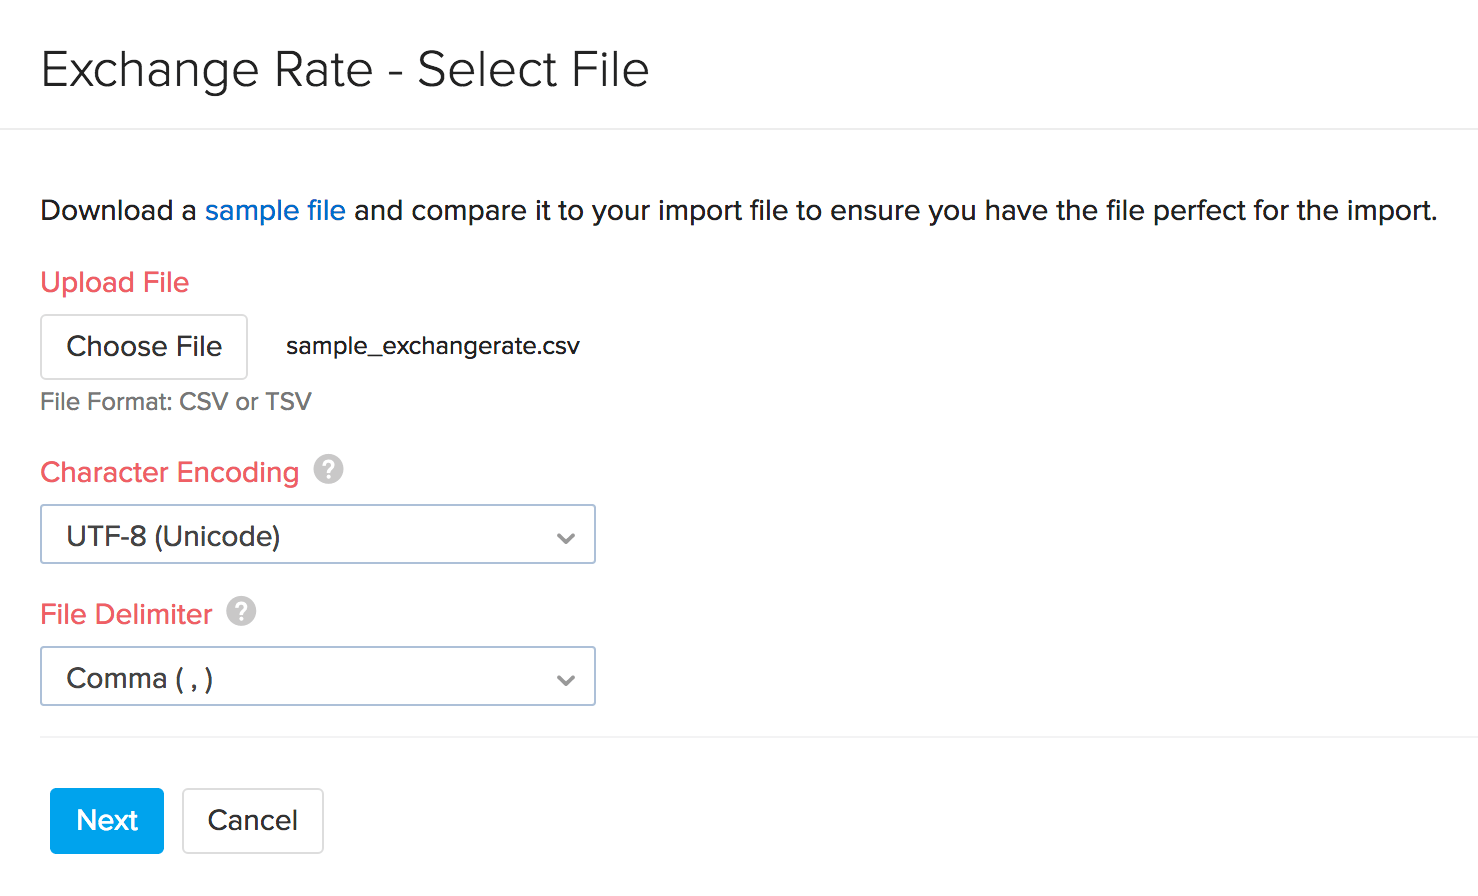
- Select the relevant CSV or TSV file from your hard drive.
- You can download our sample file for preparing your import file according to the app. Click on Sample file to download it to your computer.
- Ensure that you select the correct character encoding type.
- Click on Next to proceed to mapping fields.
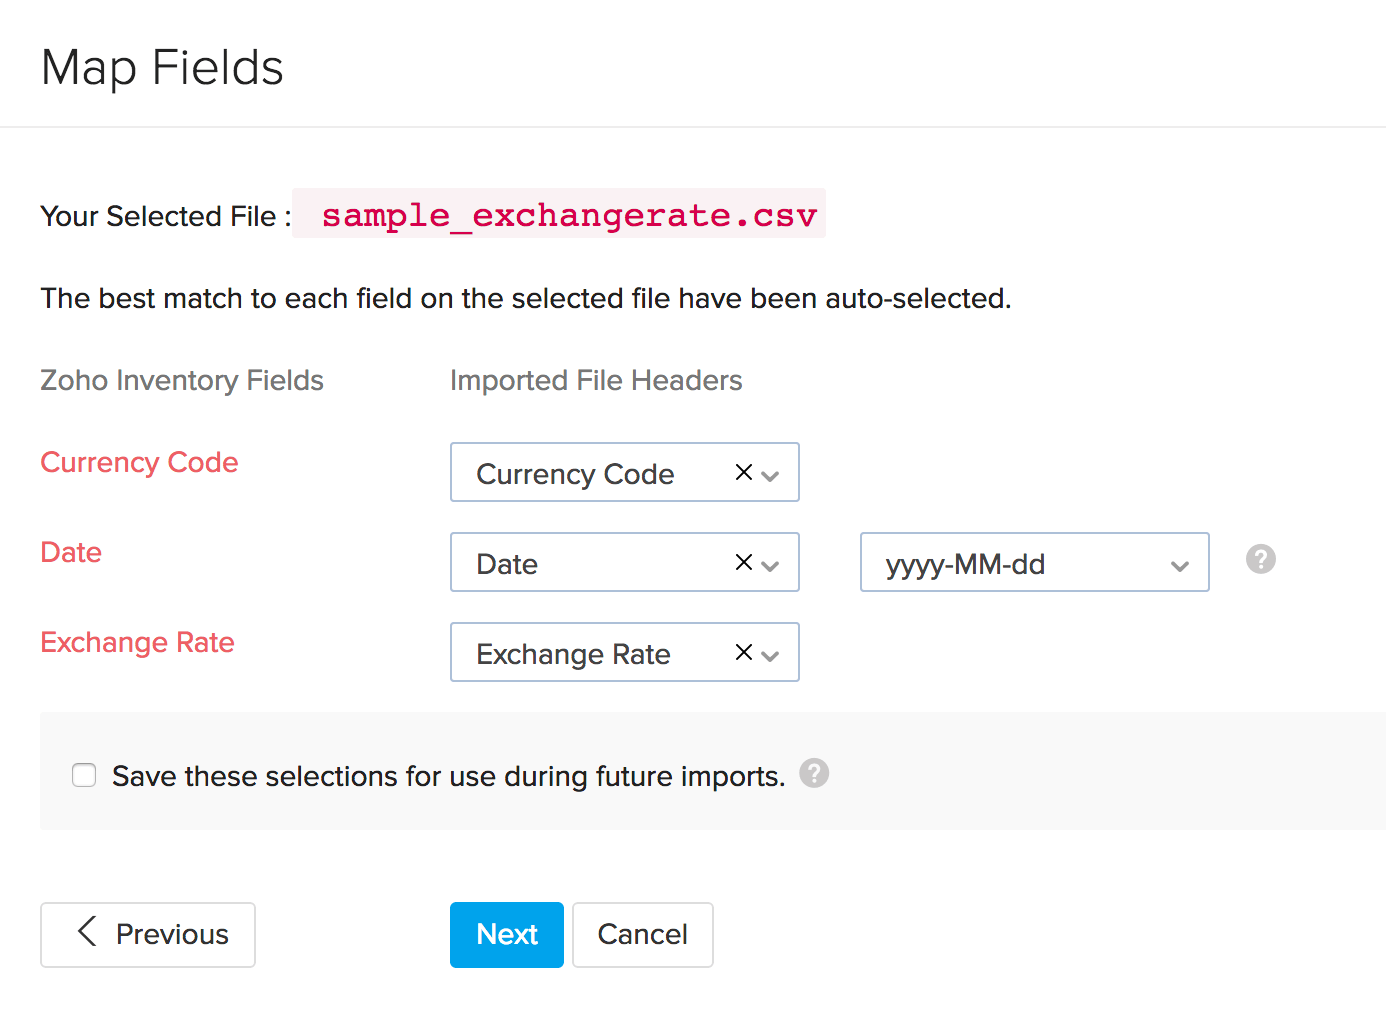
- A Map Fields screen that appears, map the fields mentioned in your import file with the fields of Zoho Inventory.
- Assign the appropriate title to the fields of the import file.
- Select the decimal type under the rate.
- In case you wish to save this preference for future imports, click on the check box option above the Next button.
- Click on Next to proceed further.
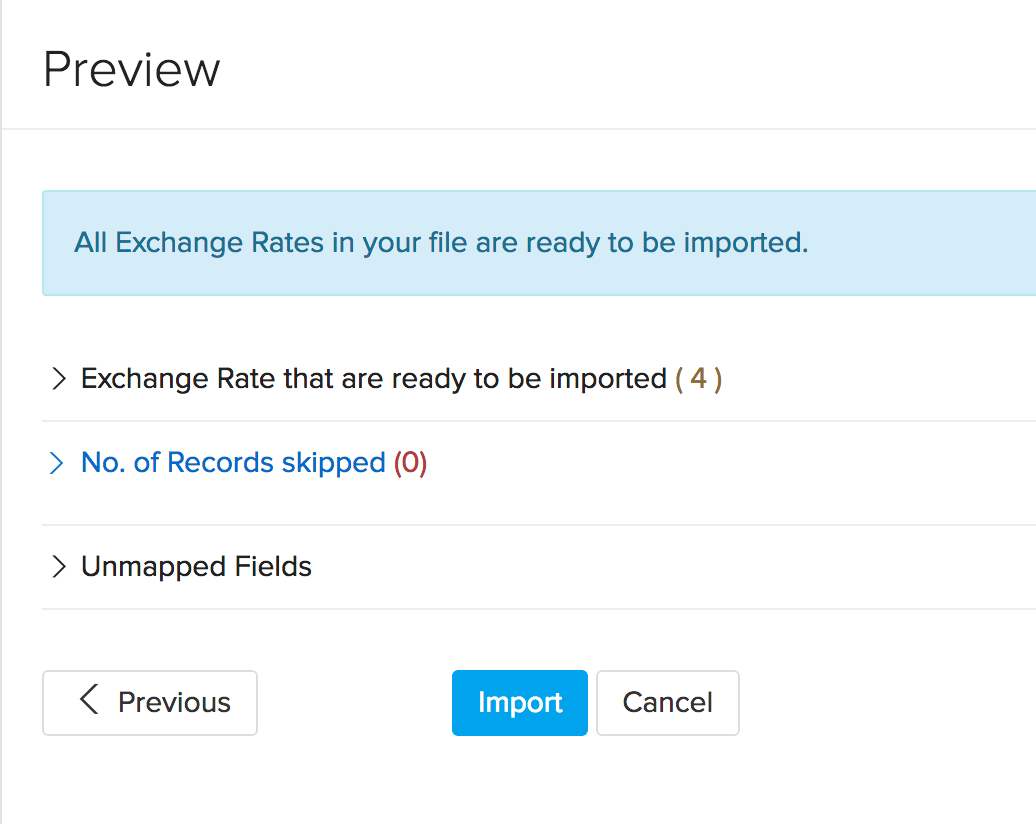
- In the Preview window that appears, you can view a synopsis of information such as number of correct items that can be imported, no of records skipped and unmapped fields.
- Click on Import to finish importing the file.
Viewing exchange rate history for a currency
Important Note: This is available only for organizations that have not enabled automatic exchange rate feeds and rely on manually adding/importing exchange rates.
To view a list of past exchange rates entered for a specific currency:
- Click the Gear icon in the top right corner.
- Navigate to Organization Settings.
- Click Currencies under Setup & Configurations.
- Scroll over the desired currency row.
- Click on the View exchange rates button that appears.
This can be a good synopsis on the exchange rate fluctuations. You can also add a new exchange rate or delete an existing rate from this page as well.

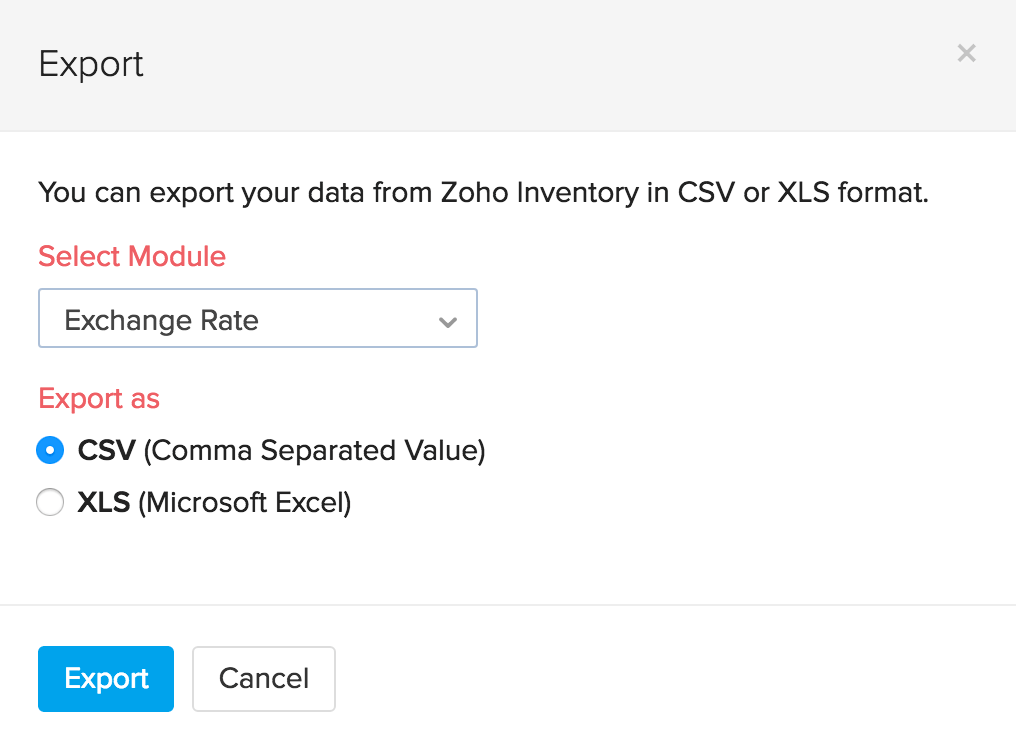
Exporting Exchange Rates
To export Exchange Rates:
- Click the Gear icon in the top right corner.
- Navigate to Organization Settings.
- Click Currencies under Setup & Configurations.
- Click the More icon in the top right corner.
- Click the Export Exchange Rates option from the dropdown.
- Select from either CSV or XLS file format.
- Select a location on your computer to save the file.