
Sales
The sales section consists of three reports:
Sales by Customer
This report is a summary of all the invoices that you’ve created for the different customers in your organization. Invoices in the Draft status won’t be reflected here.
To view this report:
- Go to Reports > Sales by Customer.

Click any amount in the report to view its drill down report. You can sort the customers in an ascending or descending order by clicking the up-down arrow next to NAME.
This report has the following sections:
Name
The customer for whom you’ve created invoices period.
Invoice count
The total number of invoices which you’ve created for the customer.
Sales
The total of all the invoices created for the customer, exclusive of tax.
Sales with tax. The total amount on all the invoices for the customer, inclusive of tax.
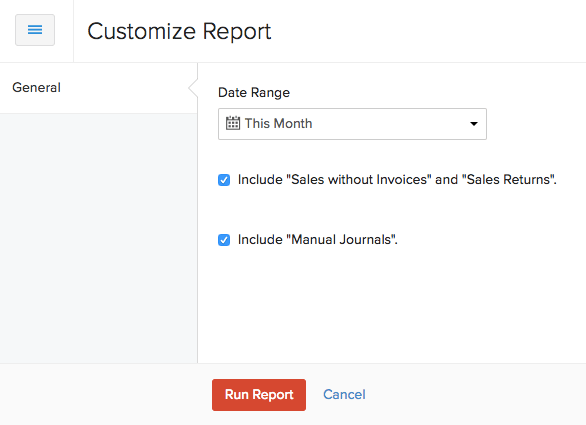
To customize this report:
- Go to Reports > Sales by Customer.
- Click Customize Report in the top of the page.

You can customize the report based on the following filters:
| Filters | Description |
|---|---|
| Date Range | Generate the report for different time periods or set a custom time period of your own. |
| Include “Sales without Invoices” and “Sales Returns” | Any sales transactions that you record in Zoho Books other than the invoices like a bank transaction for the customerwill also be shown. |
| Include Manual Journals | Any sales entries in manual journals will be displayed. |
- Click Run Report.
Sales by Item
This report is a summary of all the items which are sold in your organization and their average prices.
To view this report:
- Go to Reports > Sales by Item.

This report has the following sections:
Item name
The name of the items which are sold during a particular period.
Quantity sold
The total number of items sold.
Amount
The total amount received for all the items sold.
Average price
The average price of all the items sold to your customers.
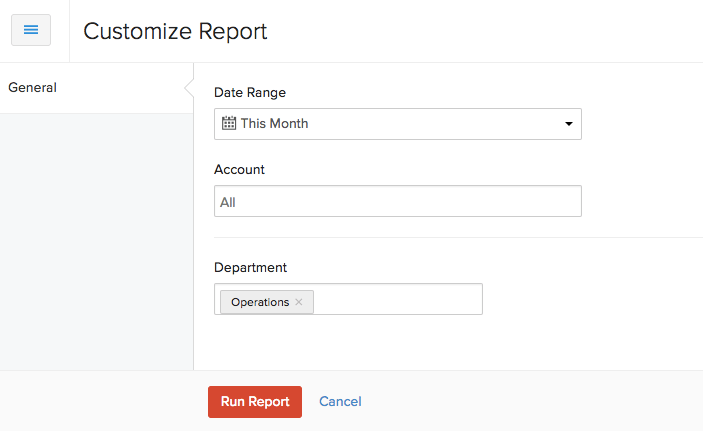
To customize this report:
- Go to Reports > Sales by Item.
- Click Customize Report in the top of the page.
You can customize the report based on the following filters:
| Filters | Description |
|---|---|
| Date range | Generate the report for different time periods or set a custom time period of your own. |
| Account | Select the account for which you want to track the sales in the report. |
| Reporting tags | Filter your reports based on the reporting tags that you have created. |
- Click Run Report.
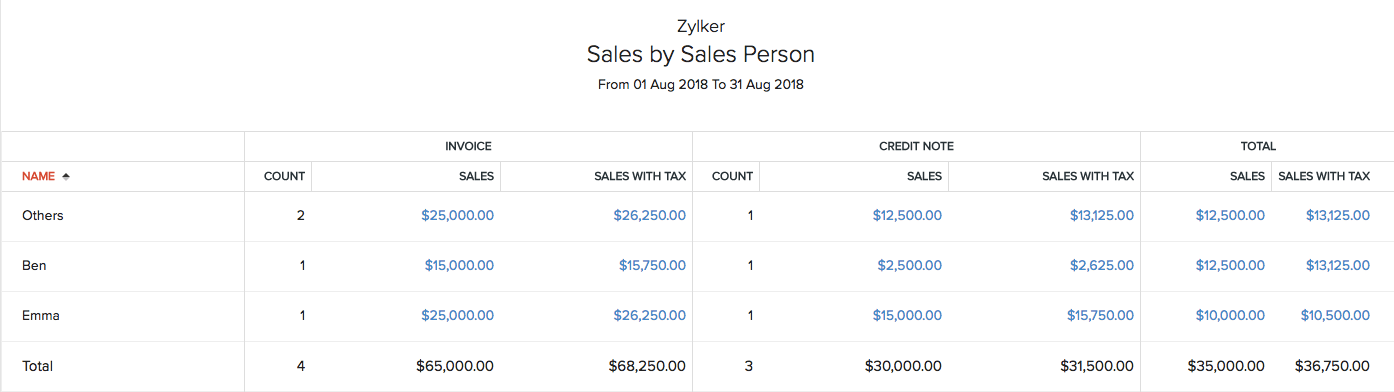
Sales by Salesperson
This report is a summary of all the invoices and credit notes that different users and sales persons have created in your organization.
To view this report:
- Go to Reports > Sales by Sales Person.
Click any amount in the report to view its drill-down summary.
This report has the following sections:
INVOICE
Invoices by user
The Others section contains all the invoices created by you or other users in your organization. These invoices are not associated with any sales person.
Invoices by sales person
Below the Others section, you’ll be able to find the list of all the invoices created by different salespersons in your organization.
The different fields in the report table are:
Count
The total number of invoices.
Sales
The total for all the invoices, exclusive of tax .
Sales with tax
The total of all the invoices, inclusive of tax .
CREDIT NOTE
Credit notes by user
The Others section contains all the credit notes created by you or other users in your organization. These credit notes are not associated to any sales person.
Credit notes by sales person
Below the Others section, you’ll be able to find the list of all the credit notes created by different sales persons in your organization.
Count
The total number of credit notes.
Sales
The total of all the credit notes, exclusive of tax.
Sales with tax
The total all the credit notes, inclusive of tax.
TOTAL
In this section, we have the total value of the sales made by the users as well as the salespersons in your organization.
This is how the fields in this section will be calculated:
Amounts in invoice - Amounts in credit notes
Sales
The total value of all your sales, exclusive of the tax amount.
Sales with tax
The total value of all your sales, inclusive of the tax amount.
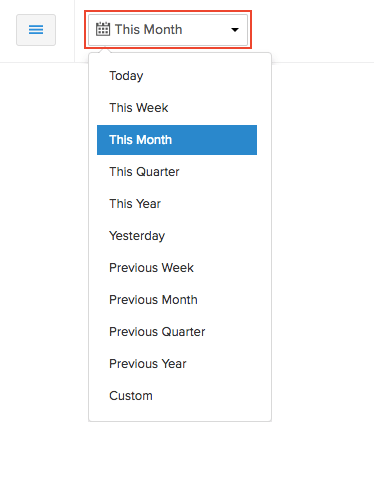
You can customize this report based on the period for which you want to generate it. To do so:
- Go to Reports > Sales by Sales Person.
- Select the period for which you want to generate this report from the dropdown.
Sales Summary
This report provides a summary of the invoices and sales receipts, showing total sales, tax details, items sold, and quantity moved for a chosen date range. It also includes the credit note details, and automatically adjusts the total sales amount by subtracting the issued credit notes.
To view this report:
- Go to Reports on the left sidebar.
- Scroll down to the Sales section, and select Sales Summary.
The report will be displayed, and it contains the following sections:
- Date: The date on which the transactions are recorded.
- Invoice Count: The number of invoices and sales receipts created on a specific date.
- Total Sales: The total value of sales made to customers.
- Total Sales With Tax: The total value of sales made to customers, including tax.
- Total Tax Amount: The total tax applied to the transactions recorded on a specific date.
To customize this report:
- In the Sales Summary report page, click the Customize icon in the top right corner.
- In the next page, under General, fill in the following fields:
- Date Range: Choose the date range for which you want to generate the report.
- Group By: Choose how you want to group the records displayed in the report.
- Navigate to Show/Hide Columns on the left sidebar, and choose which columns must appear in the report.
- Click Run Report.
The report will be generated based on chosen preferences.
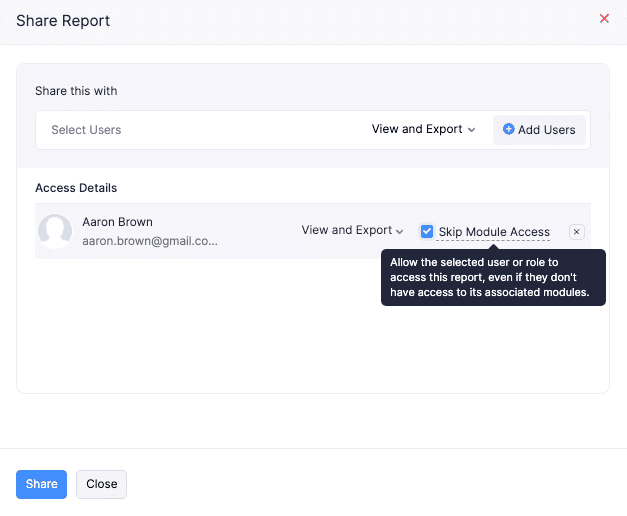
To share this report with other users in your organization:
- In the Sales Summary report page, click the Share Report icon in the top right corner.
- In the Share Report pop-up, fill in the following fields:
- Users: Select users to grant access to this report.
- Permissions: Configure permissions for the selected users. The available options are View only and View and Export.
- Click Add Users. The selected users will be listed below.
- Check the Skip Module Access option next to the added user if you want them to access the report, even if they don’t have access to the associated modules.
Note: If you want to remove a user, click the Remove icon next to the listed user in the Share Report pop-up.
Click Share.
The report will be shared with the selected users, and they can access it based on chosen preferences.
 Yes
No
Yes
No
Thank you for your feedback!